Activity 4 – Amazing turns |
Yes, the quickest route between two points is a straight line, but what is the fun in that? In the previous section, you had practice in moving forward and backward with different speeds and times. By now, you should be able to predict how far scribbler will move with different settings. Now, we are going to change the speed of the Scribblers’ wheels so that one turns faster than the other. Can you think what will happen when we do that? If one wheel is moving faster than the other, the Scribbler will turn and make a circle.
In fact, the Scribbler is so smooth we can use it to draw lines and shapes! Take a look at the Scribbler, there is a hole in the top of the robot. That hole is for holding a Sharpie marker or a Dry Erase marker for use on a while board.
Pre Activity Check List:
Activity Steps:
PART A: Simple Drawing
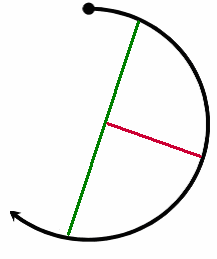
Formulas for determine diameter and radius.
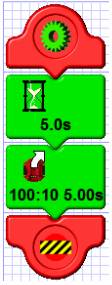
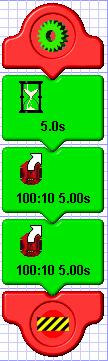
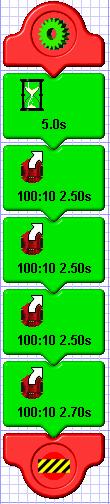
In programming, there is usually more than one (sometimes several) ways to accomplish the same tasks. In this case, we had to figure out how to make the robot keep moving after 5 seconds to complete our circle. Here are a couple of ways you could have done it: · You could have used the copy function and copied the first Motion Tile and pasted it right after the first one. When the program is run, the Scribbler will run the first Tile then the second Tile. Effectively running for 10 seconds and completing the circle.
· You could have also reduced the first Tile to be 2.5 seconds rather than 5 seconds (to make it a quarter circle) and copy and pasted it 4 times (4 quarters equals 1 whole circle!) Why do that if there is more work in the copy and pasting? Well, you would then be able to ‘fine-tune’ how long the Scribbler goes in the circle. Since you can never go more than 5 seconds, you would not be able to adjust the time upward with the first method. However, you could move one of the 2.5 seconds Tiles to 2.7 to make sure it is exactly where you want the Scribbler to stop.
· When we get a little further along, we will learn about programming with sub-routines and loops, which will be other ways to tackle these issues.
Mini Activities
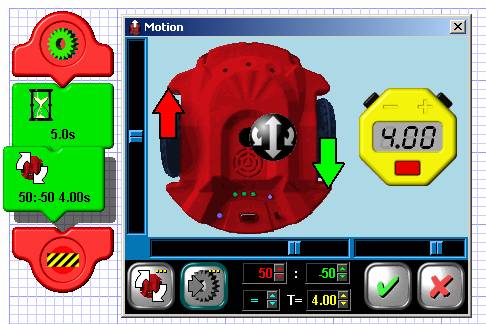
· Adjust the speed of the Motion Tile to make an 4 Inch diameter circle. Record in your log: a. Left Speed b. Right Speed c. Total Time (If you use multiple Tiles, add up the times in each)
· Create a program that will draw a 5” straight line, spin 90 degrees in place to the right and then draw another 5” straight line. The result should be two straight lines joined at a sharp right angle turn. Record in your log: a. Block 1: · Left Speed · Right Speed · Total Time b. Block 2 · Left Speed · Right Speed · Total Time
Practice the above activities until you have a good feel for how to judge the size of the circles Scribbler will make.
Running a Maze!
Now that you have mastered both straight lines and turns, let’s put your knowledge to work. Time for some Amazing Turns!
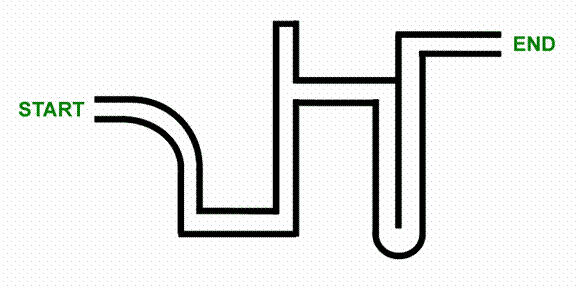
Your Instructor will show you a maze that you must navigate with your Scribbler.
Program your robot to complete the maze. You will be using the pen/marker to trace your path in the maze. You are not allowed to go outside of the boundaries of the maze. You must complete the entire maze to finish. This may take multiple trials.
Helpful Hint: It helps to know the measurements of each section of the maze.
Here is what a sample of the maze looks like:
>>Update the Lesson Worksheet with your observations. |