Scribbler Help System
Topic: S2 Editor Concepts-Index Help Section
Table of Contents
Program Overview................................................................................................................. 3
Scribbler Program Maker Layout:........................................................................................ 3
Program Area:................................................................................................................... 3
Program Action Tiles:......................................................................................................... 3
Menu Bar:......................................................................................................................... 4
S2 Top Panel Buttons............................................................................................................. 4
Clearing the Worksheet..................................................................................................... 4
Saving a Program............................................................................................................... 4
Loading a Program............................................................................................................. 4
Restoring the Factory Program........................................................................................... 4
Calibrating the S2............................................................................................................... 5
Sensor Monitoring............................................................................................................. 5
Help and Tooltips............................................................................................................... 5
Scribbler Sensor Observation Deck - Monitor Sensors............................................................. 6
Obstacle Sensors............................................................................................................... 7
Light Sensors..................................................................................................................... 8
Line Sensors..................................................................................................................... 10
Identifying Areas on the Scribbler 2 Robot............................................................................ 11
Action Bar............................................................................................................................ 13
LED Switching................................................................................................................... 13
How to Program the LEDs on the Scribbler 2...................................................................... 14
Moving the Robot................................................................................................................ 16
How to use the Motion Tile in your program..................................................................... 16
Flags (Raising and Lowering)................................................................................................. 19
Inserting Music.................................................................................................................... 20
The Create Sounds Panel.................................................................................................. 20
Pauses................................................................................................................................. 22
Observe a Sensor................................................................................................................. 22
Line Sensor...................................................................................................................... 23
Barcode Sensor................................................................................................................ 24
Obstacle Sensor............................................................................................................... 24
Stall (Crash) Sensor.......................................................................................................... 24
Light Sensor..................................................................................................................... 25
Coin Toss Condition.......................................................................................................... 26
Test Additional Conditions.................................................................................................... 28
Perform a Computation........................................................................................................ 28
Looping................................................................................................................................ 28
Infinite Loops:.................................................................................................................. 29
Counted Loops:................................................................................................................ 29
Exiting Loops.................................................................................................................... 29
Creating/Calling Subroutines................................................................................................ 30
Using Subroutines in the Scribbler Program Maker............................................................ 31
How to Call a Subroutine.................................................................................................. 32
End a Program...................................................................................................................... 33
Trouble Shooting Scribbler Connections................................................................................ 33
Program Overview
When the Scribbler Program Maker is started, you are presented with a new worksheet. The worksheet is where you will place the Tiles that make up your Scribbler program.
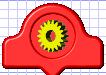
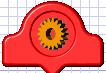
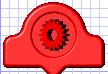
The main program always begins at the red "start" tile labeled with the green gear. It ends with the red "end" tile labeled with the yellow- and black-striped barricade. The program shown here is empty and doesn't do a thing. If you were to load this program into the Scribbler, it wouldn't do anything either.
To make the Scribbler do something, you have to add Programming Tiles to the program. The Tiles are selected using the buttons in the left hand column, and must always be inserted between two existing Tiles on the worksheet.
Scribbler Program Maker Layout:
There are 4 main areas in the Scribbler Program Maker

Program Area:
The program is the grid area where all the program Tiles are places. This is the only area where program can be created.
Program Action Tiles:
In the program area, Program Action Tiles are placed that tell the robot what to do. All action program Tiles must be placed between the red Tiles that are on a new sheet.
Menu Bar:
The Menu Bar is the main control area that is used to program control. Items like open, save, new and the help system are located here.
S2 Top Panel Buttons
![]()
The buttons included in the Top Panel are described briefly here.
Clearing the Worksheet
 Once your program is saved you can
clear the worksheet and start fresh. Just click the new worksheet button. This
will clear all your work and you can start writing a new program.
Once your program is saved you can
clear the worksheet and start fresh. Just click the new worksheet button. This
will clear all your work and you can start writing a new program.
Saving a Program
 You can save your work for later
retrieval simply by clicking the save file button. This will bring up a file
save dialog box that will let you choose a name for your file and select a
location to store it.
You can save your work for later
retrieval simply by clicking the save file button. This will bring up a file
save dialog box that will let you choose a name for your file and select a
location to store it.
Loading a Program
 To reload your program, or to load
a different one into the worksheet, click the load file button, as shown. A
dialog box will come up which will let you select which program you want to
load.
To reload your program, or to load
a different one into the worksheet, click the load file button, as shown. A
dialog box will come up which will let you select which program you want to
load.
Restoring the Factory Program
 To restore the program the Scribbler
came loaded with, plug the serial cable into the Scribbler’s programming port
and turn the Scribbler on. Then click the restore button. The Scribbler’s
factory program will then be uploaded. This operation has no effect on the
current worksheet and you will not lose your work.
To restore the program the Scribbler
came loaded with, plug the serial cable into the Scribbler’s programming port
and turn the Scribbler on. Then click the restore button. The Scribbler’s
factory program will then be uploaded. This operation has no effect on the
current worksheet and you will not lose your work.
Calibrating the S2
 The Scribbler calibration program is
currently not needed. However, this calibration button has been retained as a
placeholder for possible future uses.
The Scribbler calibration program is
currently not needed. However, this calibration button has been retained as a
placeholder for possible future uses.
Sensor Monitoring
The Sensor Monitor allows us to learn what the robot is sensing with its sensors. Scribbler sensors help it avoid obstacles, detect light, and locate paths. The Sensor Monitor Process allows you to view what the robot is “seeing” before programming it. This helps to understand what kind of information is available to programs. The Scribbler Sensor Observation Deck is used to view the sensor values.
Help and Tooltips
 To bring up the help file click the
help button. If the help button is lighted, the tooltip system is also enabled.
Tooltips are little balloon boxes that pop up occasionally when you move over a
button or control for a while. They're designed as reminders about what each
control does. Once you become familiar with the program's functions, these
tooltips may seem more annoying than helpful. In that case you can simply turn
them off with a right-click on the help button. Another right-click will turn
them back on, and so forth.
To bring up the help file click the
help button. If the help button is lighted, the tooltip system is also enabled.
Tooltips are little balloon boxes that pop up occasionally when you move over a
button or control for a while. They're designed as reminders about what each
control does. Once you become familiar with the program's functions, these
tooltips may seem more annoying than helpful. In that case you can simply turn
them off with a right-click on the help button. Another right-click will turn
them back on, and so forth.
Scribbler Sensor Observation Deck - Monitor Sensors
Click the Sensor Monitoring button at the top of the Scribbler Program Maker window.
If the connection to the robot is successful, a green light will appear letting you know that you successfully connected to the Scribbler Sensor Observation Deck.
If however you see a red light, that means the program could not connect to the Scribbler Robot.
Check that the Scribbler is connected to the computer and that it is turned on. If you are still having issues opening the Scribbler Sensor Observation Deck, check the batteries. If the batteries are low, or almost out of power, then the Scribbler Program Maker might not be able to connect to the robot even if have it connected and powered on. Try recharging the batteries or adding new, fresh batteries.
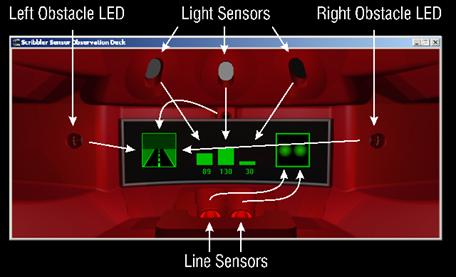
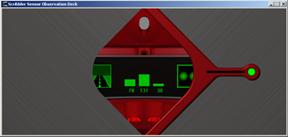
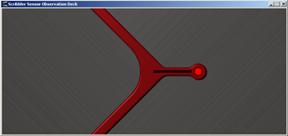
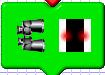
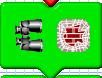
When the Observation Deck is opened, you will see a window similar to the one below. There are 3 main sensors the Scribbler Robot uses to navigate and make decisions; Obstacle Sensors, Light Sensors and Line Sensors.
Obstacle Sensors
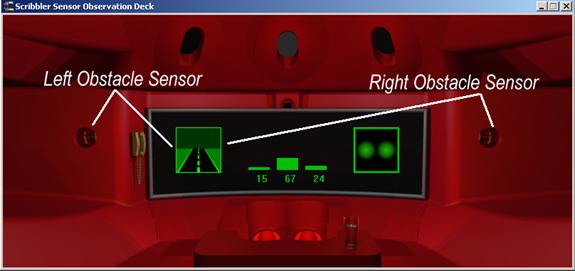
The obstacle sensors are like the eyes of the Scribbler. There are two of them, left and right, located on the front of the robot. Their main purpose is to look forward and to see if there is anything in the front of the Scribbler Robot that might block its path.
The Left and Right Obstacle Sensors use light to send a signal forward. This is an Infrared or IR signal - the same type of signal used from a remote control when you change the channel on a TV. When the signal is sent out, the robot waits for it to bounce back. It then measures the time it takes for the signal to bounce back. The longer it takes, the further away objects are. The shorter the time it takes, the closer objects are. By using two sensors, like eyes on both sides of the robot, it can more accurately tell which side the objects are on and more reliably avoid them!
Inside of the Scribbler Sensor Observation Deck there is an image of a road that is a visual representation of what the scribbler sees. There are 4 different possibilities that the robot can see.
· All Clear (No objects detected on either side)
· Blockage on the LEFT side of the robot
· Blockage on the RIGHT side of the robot
· Blockage on BOTH sides of the robot
|
All Clear |
Obstacle LEFT |
Obstacle Right |
Obstacle BOTH |
|
|
|
|
|


You can experiment with the Obstacle Sensors by placing your hand in front of each of the sensors on the robot and watch the Obstacle Sensor Indicator change to one of the 4 different statuses.
Light Sensors
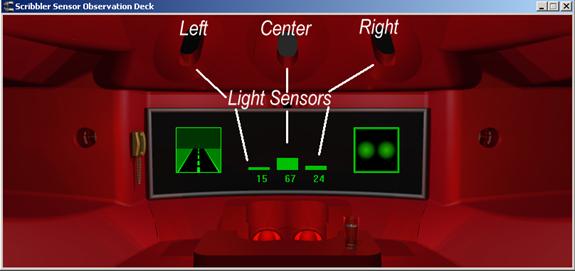
The Light Sensors allow the Scribbler Robot to detect different brightness levels of light and react to it. The robot can then use these sensors to follow light, seek out shade or make decisions based on how bright the light it detects is.
The Light Sensors are located on the front of the Scribbler Robot at the top. There are 3 Light Sensors; Left, Center and Right. Unlike the Obstacle Sensors, which either detect an object or don’t detect an object, the Light Sensors can see many different levels, or ranges of light. We can use these ranges to determine how bright or dim the light is. Why kind of things could we make the Scribbler do by checking the Light Sensors? Are there any Robots you know that use Light Sensors?
Inside of the Scribbler Sensor Observation Deck there are 3 bar sensor indicators that measure the amount of light seen by each one of the sensors. The values of the light being seen by the robot are also displayed. There range varies between each robot, so you will have to experiment to figure out the ranges.
|
Left Light Sensor |
Center Light Sensor |
Right Light Sensor |
|
|
|
|

The best way to determine the range is to use a bright flashlight to shine a light directly into each of the Light Sensors one at a time. The bar indicate will go to the top and a number will be displayed. That is near the brightest light value the robot can receive. Then you can use your finger to cover the Light Sensors and look at the reading. This will be near the lowest light value the robot can receive. Repeat this process for all 3 sensors as each one will vary slightly.
Line Sensors
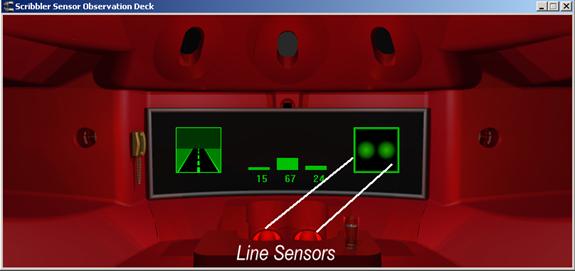
The Line Sensors on the Scribbler help the robot follow a pre-drawn path or to read or avoid obstacles it sees on the floor. The Line Sensors work similar to the Obstacle Sensors, however, they are located on the bottom of the robot and face the floor. If you flip the scribbler over, you will see 4 sensors near the front of the Scribbler. These are the Line Sensors.
There are many applications for these sensors. One is being able to look at a line and follow it along a very complex path. If the robot senses that it’s going off the path, it can correct itself to get back on the path. Another useful application for these sensors is the ability to read items below it. The sensors can read items like bar codes that could tell the robot where it is, or what it’s supposed to do next. Finally, the sensors can keep the robot out of trouble. It could use the sensors to check to see if it’s out of bounds on a course or in a restricted area. Can you think of any other reasons to have sensors on the bottom of the robot?
The Line Sensors have 4 different conditions it can sense. These conditions are shown by the indicator on the right side of the Scribbler Sensor Observation Deck. The 4 conditions are:
· No Line Detected
· Line Detected on LEFT
· Line Detected on RIGHT
· Line Detected on BOTH sides
|
No Line |
Line on Left |
Line on Right |
Line on Both Sides |
|
|
|
|
|


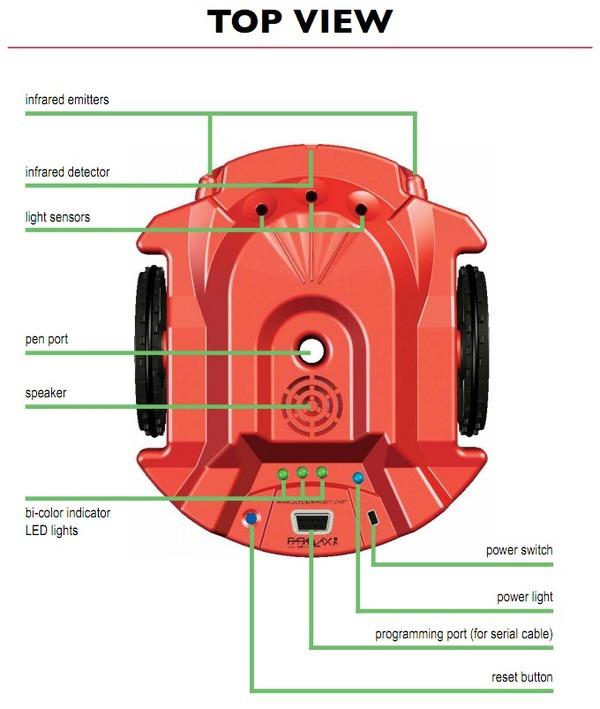
Identifying Areas on the Scribbler 2 Robot

Action Bar
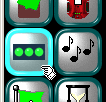
All of the items on the Action Bar are items you can place in your program. Each Tile performs a task. There are actions Tiles for lights, music moving, observing your environment and many more. When you move your mouse over each Tile, a short description of what the button does is shown.
LED Switching
LEDs stand for Light Emitting Diode. You’ve probably seen or used them is different electronics you have had in the past. Can you think of some places where LEDs might be used? The most common use used to be electronic applications to indicate power like on your computer or TV. Now, however, LEDs are used is many different applications such as flashlights and even the TV screen to display the picture. Our robot, the Scribbler 2, is equipped with 3 Bi-Color LED’s that we can turn on and off. If you look at the Scribbler 2, you’ll see that there are actually 4 LEDs. What do you think that other LEDs is for? If you guess power, then you are correct. The 4th LED is used by the Scribbler 2 Robot to indicate power. If it starts flashing, it means your batteries need to be charged or replaced.
How to Program the LEDs on the Scribbler 2
 To insert a LED Tile into your program, you must first
select it using one of the tool buttons on the left hand side of the screen.
When you click on one of these buttons, it will light up, signifying the tool
you have chosen. Here,
To insert a LED Tile into your program, you must first
select it using one of the tool buttons on the left hand side of the screen.
When you click on one of these buttons, it will light up, signifying the tool
you have chosen. Here, 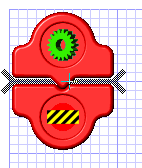 the LED On/Off tool has been chosen.
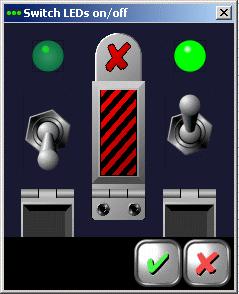
Next, move the mouse pointer out onto the worksheet. When you position the pointer between two Tiles, as shown here, a cursor will appear, indicating that it's okay to insert the selected Tile into the chosen position. Sometimes, the cursor may not appear where you want to insert a Tile. This indicates that the position you've chosen is not a valid location for that particular Tile, and you will not be allowed to insert the Tile there. Note: The Scribbler Program Maker will not let you generate a program containing errors.
Once you've positioned the pointer where you want the Tile, and the cursor appears, click the mouse once. The Tile you've selected will appear, hovering above the worksheet. In most cases, a configuration box will also pop up, allowing you to configure the Tile for the actions you want it to perform. In this case, clicking on the switches will control what you want the LEDs to do.
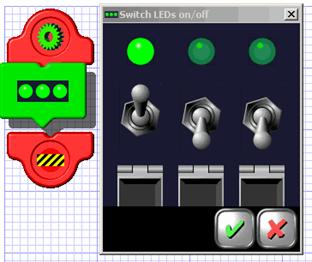
They can each be turned on, turned off, or left alone (designated by a red-striped switch cover).
For this example, we'll turn the
left LED on and the middle and right 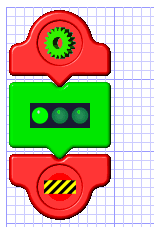 LEDs off.
Next, click on the green checkmark. (The green checkmark always means "yes", "okay", or "true". The red "X" always means "no", "not okay", or "false".) When you've done this, the Tile will nestle into place on the worksheet, reflecting the action you've chosen. At this point, you have a real program that actually does something: it turns the left LED "on".
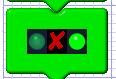
There 3 different conditions for the LEDs.
- Off
- Not Changed (It says in whatever state is was before)
- On
This is what the program Tile would look like if we used these settings:
Use the LED Tiles to help check status. If something in a program is true or false, use the LEDs to let us know that. If the condition is true, we could turn on the left LED, if the condition is false, we could turn off the left LED light. This process is very useful in debugging programs. By using LEDs to show status of conditions, we can determine if the program is working correctly or if it has errors.
Moving the Robot
One of the first thing people think about when they think of robots is movement. There are many different types of movement that robots can perform. The Scribbler robot is a rolling robot that is powered by to electronic devices called servos (motors). These servos are attached to the two large wheels. The rear wheel on the Scribbler is not powered, but is used for balance and to let the robot know if it’s moving or not. The servos have a special tracking component called encoders. These encoders make it possible for the Scribbler to be very accurate in its movements. Regardless of battery level or the surface it’s moving over, the Scribbler Robot will always move as you program it to.
Both servos can turn the wheels in a forward or reverse direction. By varying how fast each wheel is spinning, you can control how the Scribbler moves. When the wheels turn at the same speed, the Scribbler will move straight. When one wheel turns faster than the other, the robot will turn. The distance the robot will travel is set by varying the amount of time the wheels spin. The greater the time, the farther distance Scribbler will travel.
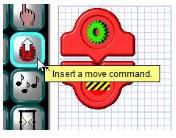
How to use the Motion Tile in your program.
To make the robot move, you need to insert a Motion Tile and adjust the settings. The Motion Tile is located with the other Action Tiles. Click the “Insert a Move Command” button to select the Motion Tile.
When you place the Motion Tile into the program, the Motion Control Panel will be displayed.
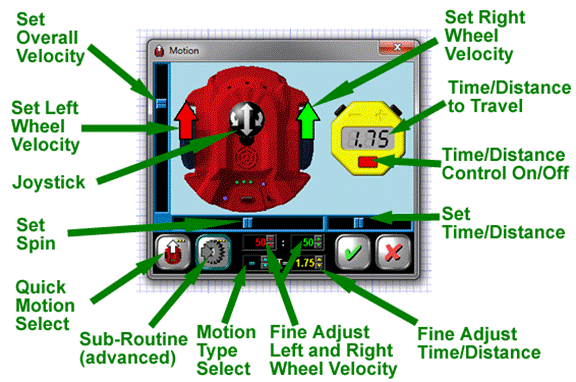
IMPORTANT: There is no setting for how far to move Scribbler, only how long and how fast.
The Motion Control Panel allows adjustment of the Scribblers speed in many ways. It also allows you to choose how long you want the Scribbler to move in the chosen manner. This time can be selected in 0.05-second increments, up to 5 seconds. The Scribbler will run for the amount of time selected and then stop. If you don't choose a time (i.e. time = 0), the Scribbler will run at the chosen speed indefinitely, until commanded to do otherwise. If you set it to 0, you can also make Scribbler stop.
The easiest way to adjust the settings is to grab the Joystick (the black circle in the center of the scribbler) and drag it to where you want to go. All of the other settings are a way to fine-tune the speed. Use your mouse to click on the up and down arrows to get the exact values desired.
Hint: Use the Quick Motion Select to select a pre-set common movement type. Every click will show a different type of movement.
To adjust the time, use the Time/Distance ‘Stop watch’ to add or remove time. Clicking on the red Time/Distance button will turn the timer on. Clicking the plus (+) icon will add time, and clicking the minus (-) icon will subtract time.
Flags (Raising and Lowering)
 When we say the word
flags, what is the first thing that comes to mind? If you said the United
States flag or your state flag, you are right. That’s what most people thing
of. In this case, Programming Flags act very similar to traditional flags in
that they can be Raised or Lowered. In programming, a flag is a way to tell if
something is one thing or other.
When we say the word
flags, what is the first thing that comes to mind? If you said the United
States flag or your state flag, you are right. That’s what most people thing
of. In this case, Programming Flags act very similar to traditional flags in
that they can be Raised or Lowered. In programming, a flag is a way to tell if
something is one thing or other.
For example, if a Flag is raised, it means something is True or it means, Yes, or On. If a Flag is lowered, it means something is False or it means, No, or Off. It’s a simple way to check and save a condition. Most commonly, it signals that an event occurred. There are seven different colored flags, and the flag tile allows any one of them to be raised or lowered.
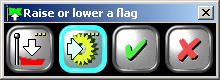
The edit box for the flag Tile has multiple-choice buttons for the flag action and for which subroutine to call, if any.
Inserting Music
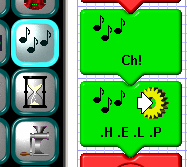 The sound Tile is
used to activate the S2's speaker for playing short tunes, (such as the bugle
call "Charge!" in the first example), and sound effects, (such as
spelling "HELP" in Morse code in the second example). The program
comes with a library of sound bites which can be strung together in various
sequences to obtain the desired sounds. It is also possible for the sound Tile
to call a subroutine when it is finished playing a sound.
The sound Tile is
used to activate the S2's speaker for playing short tunes, (such as the bugle
call "Charge!" in the first example), and sound effects, (such as
spelling "HELP" in Morse code in the second example). The program
comes with a library of sound bites which can be strung together in various
sequences to obtain the desired sounds. It is also possible for the sound Tile
to call a subroutine when it is finished playing a sound.
The Create Sounds Panel
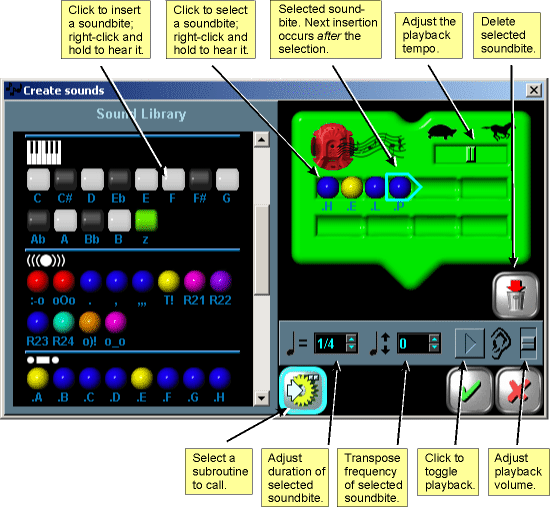
Sound bites are copied from the library into the sound Tile by clicking on them. You can also right-click-and-hold on any sound bite to hear what it sounds like and to see its full name displayed. Sound bites are inserted in sequence, beginning to the right of the selected Tile (designated with the light blue outline). You can select any sound bite in the Tile by clicking on it. To delete a sound bite, first click on it to select it, and then click on the trashcan button.
Once you've assembled your sound sequence, you can play it back on your computer to test it by clicking the play button. The play button arrow will light up and remain lighted until the sequence has played back or until you click it again to stop it. You can adjust the overall tempo of your sequence before testing by using the slider at the top of the Tile (the one with the turtle and racehorse). There's also a volume control for the computer that you can adjust during playback. The tempo control will also affect sounds coming from the Scribbler 2 when your program is uploaded. Note: The volume control is only for the computer and does not affect the volume on the Scribbler Robot.
In addition to the overall tempo adjustment, you can also adjust the tempo and frequency of individual sound bites in the sequence. This is done using the arrow boxes to the left of the play button. The first controls the duration of the sound bite, 1/4 being the default duration. The second allows you to shift the frequency of the sound bite down an octave, or up by one or two octaves.
Pauses
 One good reason to
pause a program would be to wait for an event to occur. Another example could
be to flash an LED. You could light the LED, then Pause the program, then turn
off the LED. Pausing a program actually has hundreds of uses in the
programming world and will be very useful when working with the Scribbler 2
Robot.
One good reason to
pause a program would be to wait for an event to occur. Another example could
be to flash an LED. You could light the LED, then Pause the program, then turn
off the LED. Pausing a program actually has hundreds of uses in the
programming world and will be very useful when working with the Scribbler 2
Robot.
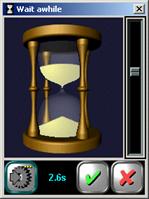 To insert a Pause, select the Pause Tile icon and then
insert it into your program. The Wait Awhile Panel will automatically appear.
To select the pause duration, drag the slider up or down until the time at the
bottom of the panel shows the time you want to pause for in seconds. So, 2.5s
would be 2 and ½ seconds.
To insert a Pause, select the Pause Tile icon and then
insert it into your program. The Wait Awhile Panel will automatically appear.
To select the pause duration, drag the slider up or down until the time at the
bottom of the panel shows the time you want to pause for in seconds. So, 2.5s
would be 2 and ½ seconds.
Note: It will not change the S2's state, however. If the S2 is moving, it will continue to move during the pause. If any of its LEDs are on, they will stay on. The Pause Tile ONLY pauses the running of the programming.
Observe a Sensor
Using the Scribbler Sensor Observation Deck, we are able to look at a virtual example of the scribbler and see what the sensors were seeing. But, how do we get the Robot to act on what it’s seeing? This is where the Observe a Condition Tile comes in.
There are several different conditions that can be observed and acted on: Line Sensor, Barcode Sensor, Obstacle Sensor, Stall Sensor, Light Sensor, and Coin Toss Sensor.
|
Line Sensor |
Barcode Sensor |
Obstacle Sensor |
|
|
|
|
|
Stall (Crash) Sensor |
Light Sensor |
Coin Toss Sensor |
|
|
|
|


Line Sensor
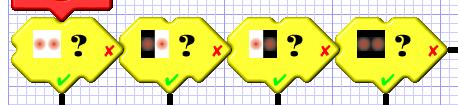
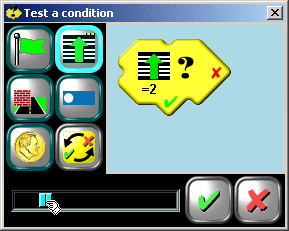
The line sensor uses two optical detectors on the bottom of the S2 to detect the presence of dark or light marks on the floor. It is used primarily for line-following, wherein a black line is created with tape or computer printouts and the S2 is programmed to follow it. There are four possible states that the line sensor can have: no black line visible, black line visible only on the left, black line visible only on the right, and black line visible on the left and right.
 You can increase the sensitivity and reduce false
positive by requiring a certain number (up to 8) of different observations
before the condition is deemed TRUE. This is done using the slider at the bottom
of the edit box. In the example to the right, a dark line will have to have
been observed on the left side only at least three times in a row for
the condition to be TRUE.
You can increase the sensitivity and reduce false
positive by requiring a certain number (up to 8) of different observations
before the condition is deemed TRUE. This is done using the slider at the bottom
of the edit box. In the example to the right, a dark line will have to have
been observed on the left side only at least three times in a row for
the condition to be TRUE.
Barcode Sensor
 The line sensor can
also be used to read barcodes placed in the S2's path. It can identify seven
different barcodes. Note: The Scribbler 2 can only read the bar codes if it is
going directly over the top of them and moving forward or reverse; NOT side to
side. Which direction to identify is selected by clicking on the line sensor
multiple-choice button? Select the barcode to recognize by moving the slider at
the bottom of the Test a Condition Panel.
The line sensor can
also be used to read barcodes placed in the S2's path. It can identify seven
different barcodes. Note: The Scribbler 2 can only read the bar codes if it is
going directly over the top of them and moving forward or reverse; NOT side to
side. Which direction to identify is selected by clicking on the line sensor
multiple-choice button? Select the barcode to recognize by moving the slider at
the bottom of the Test a Condition Panel.
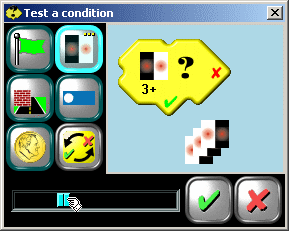
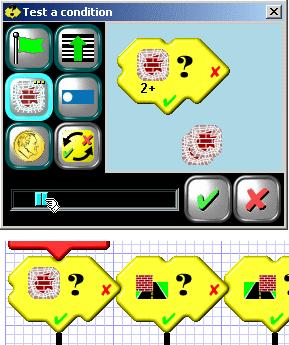
Obstacle Sensor
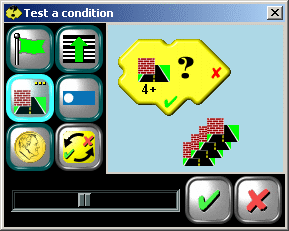 Just like the line
sensor, each of the four possible combinations of left and right obstacles
represents a separate condition. And, as with the line sensor, you can also
restrict how many consecutive times the condition must be observed for it to be
TRUE.
Just like the line
sensor, each of the four possible combinations of left and right obstacles
represents a separate condition. And, as with the line sensor, you can also
restrict how many consecutive times the condition must be observed for it to be
TRUE.

In the example, the condition of "left obstacle present and right obstacle absent" must hold for four or more successive observations for the condition to be TRUE.
You can use the slider bar at the bottom of the Test a Condition Panel to adjust how many times a condition is checked before it determined to be true or false.
Stall (Crash) Sensor
 This sensor is not
part of the Scribbler Sensor Observation Deck, but is still one of the most
important sensors the Scribbler Robot has at its disposal. The Stall Sensor
detects if the robot is stuck. Take a look at the Scribbler 2 Robot.
This sensor is not
part of the Scribbler Sensor Observation Deck, but is still one of the most
important sensors the Scribbler Robot has at its disposal. The Stall Sensor
detects if the robot is stuck. Take a look at the Scribbler 2 Robot.
How do you think the stall sensor knows if the robot is moving or not? Here is a hint: The Stall Sensor is located on the back 3rd wheel.
Imagine the Scribbler driving around, the two big wheels are being driven by the motors in the robot. The rear wheel is just being pulled around. Now, what happens if the robot hits a wall? The front wheels will keep spinning, because that’s what they are programmed to do. However, since the wall is stopping the robot from moving forward, the back wheel will also stop moving. That’s how we check if the robot has stalled. If the front wheels are moving and the rear real isn’t then the Stall Sensor concludes that the robot is stuck, stalled or has crashed!
As with some of the other sensors, you can restrict the stall sensor by how many times in a row it has to be detected for the condition to be true. Usually, though, a single instance is enough to know that something is wrong and needs to be corrected. The stall condition is one of the choices on the obstacle sensor multiple-choice button.
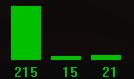
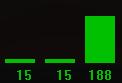
Light Sensor
The Light Sensors are the 3 Sensors on the top of the robot, facing Front Left, Center and Front Right. The brighter the light shined on the sensors, the higher the values it will return. You can use the Light Sensor Condition to check the values against each other (comparing where the light is brighter; Left Side or Right Side) or against a constant number. These numbers can be compared with each other or with constant values in various combinations to achieve TRUE/FALSE conditions that you can act on in programming.
There are 4 different conditions that can be checked for EACH of the 3 light sensors. That means there are a total of 12 different scenarios that can be checked.
If you are comparing against value of the light meter, the range for that Certain Value is 1 to 255.
Some typical values:
· Average Room Light: 30
· Completely Dark Light: 15
· Full Bright Light: 150
Here are the 4 conditions:
1. Sensor value (left, center, or right) is at least a Certain Value.
2. Sensor (left, center, or right) is the brightest of the three by at least a Certain Value.
3. Sensor (left, center, or right) is the dimmest of the three by at least a Certain Value.
4. The (average, maximum, or minimum) sensor value is at least a Certain Value.
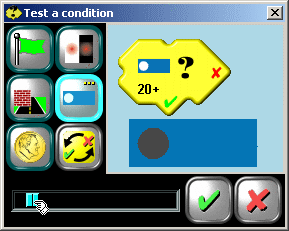
As you move the slider, the graphic in the box shows the condition being checked. In the example, the left hand light sensor must return a value of at least 20 for the condition to be TRUE.
This example would determine if the classroom lights were on. If they are on, then the condition would be TRUE, if they are off, the condition would be FALSE.
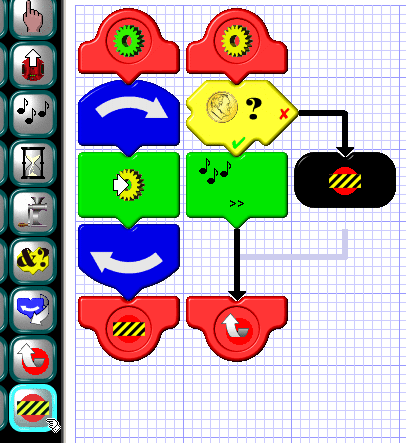
Coin Toss Condition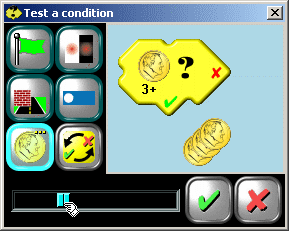
What is the percentage or chance that when you flip a coin it comes up heads or tales? Try it, flip a coin ten times and how many times does it comes up heads? As you probably saw, it was about 5 times. BUT, it’s completely random. The next time you try it, the coin could flip 8 out of 10 times to heads. That’s what the Coin Toss Condition does, it adds a sense of randomness to your programs. Can you think of an example where it would be good to have some randomness? If you were thinking navigation, that’s a good guess.
Imagine the Scribbler 2 robot driving in a straight line and it hits a wall. Now, you could ALWAYS turn right and then see if there was an obstacle in the way and proceed from there. OR, you could use the Coin Toss Condition to randomly choose to turn left or right.
You can require that anywhere from 1 to 8 consecutive coin flips has to yield "heads" for the condition to be TRUE. This is done with the slider control at the bottom of the Panel. Doing so varies the probability of the result being TRUE by cutting it in half with each successive increment in the required number of consecutive "heads". The probability for one "heads" is 50%; for two, 25%; for three, 12.5%; etc.
Test Additional Conditions
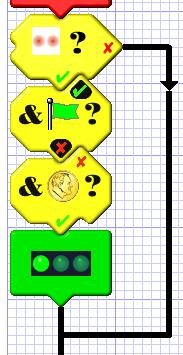 This Tile is used
ONLY in conjunction with one of the Test Condition Tile. It allows you to
check two or more conditions at once and if ALL of the conditions are TRUE, the
condition is set.
This Tile is used
ONLY in conjunction with one of the Test Condition Tile. It allows you to
check two or more conditions at once and if ALL of the conditions are TRUE, the
condition is set.
In this example, the left LED is turned on if the line sensor doesn't see a black line AND IF the green flag is NOT up (note the inverted logic here) AND IF the last coin flip came up "heads". All three conditions have to be TRUE for the entire conditional to be TRUE; otherwise the entire conditional is deemed FALSE, and the alternate path is taken.
Perform a Computation
This Tile is used in conjunction with the light sensors to record and store values for later checking. This title for calibration and other advanced features and is not covered in the activities in this course. For further information on this title, please review the Scribbler Program Maker Help system.
Looping
 If you were to
guess, what do you think looping is? If you said going in a circle or
repeating something over and over, then you are correct. Looping allows you to
perform a program segment over and over again without having to retype it
several times. A lot of the programs that you write such as navigation and
sensing will require loops. If you think about it, you probably don’t just
want to check the sensors for an object once, but to keep sensing for it until
you find something.
If you were to
guess, what do you think looping is? If you said going in a circle or
repeating something over and over, then you are correct. Looping allows you to
perform a program segment over and over again without having to retype it
several times. A lot of the programs that you write such as navigation and
sensing will require loops. If you think about it, you probably don’t just
want to check the sensors for an object once, but to keep sensing for it until
you find something.
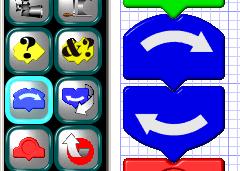
These Tiles are always inserted in pairs: one to mark the beginning of the loop, and one to mark the end. For this reason, you should always insert the loop itself first, before you start inserting its contents. Otherwise, you will have to cut and paste the contents into the loop.
 There are two types
of Loops: Infinite and Loops that only loop so many times.
There are two types
of Loops: Infinite and Loops that only loop so many times.
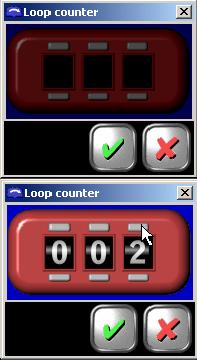
Infinite Loops:
Infinite Loops are useful for complete programs. For example, if you want your Scribbler to loop a navigation program segment until the power is shut off, you could use an Infinite Loop. The Loop Counter Panel is dark or set to zero to make the loop an Infinite Loop. This is the default setting.
Counted Loops:
Counted Loops will loop for a set amount of time. For example, if you set the counter to 5, the program will loop 5 times and then move on to the next Tile. This is useful for playing tones, lighting lights and creating programs that run for a set amount of time.
Note: You can only include 6 Counted Loops in a program. However, you can have up to 64 different Infinite Loops!
Exiting Loops
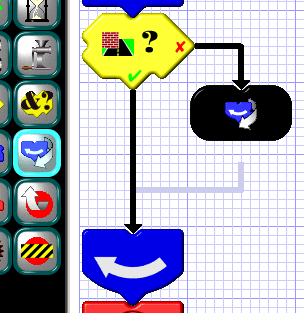 If you want to exit a loop before the count has been
reached or exit an infinite loop, you will need to use an Exit Loop Tile. In
this example, the loop will be existed when the left obstacle sensor doesn’t
detect an object.
If you want to exit a loop before the count has been
reached or exit an infinite loop, you will need to use an Exit Loop Tile. In
this example, the loop will be existed when the left obstacle sensor doesn’t
detect an object.
Note: Exit Tiles can only be inserted inside loops. The program won't let you put them anywhere else.
Creating/Calling Subroutines
Subroutines are a method for organizing your program Tiles into nice, easy to reuse segments. You can think of them like storage boxes for programs. Can you think of some reasons why you’d want to use Subroutines? One of the main reasons is program re-usability; the process of calling the same program over and over again, with out rewriting it. Unlike Looping, you can call a subroutine at anytime and just perform it once OR even call a Subroutine in a loop and perform it many times.
Let’s walk through a practical example. Let’s say we wanted to have our Scribbler write the word R O B O T on a piece of paper. Now, we can tell it to write each letter and the spaces between it without using subroutines, but then we have to write a LOT more program code. If we divided each letter and spaces between letters into a subroutine, then all we have to do is call the Subroutines for each letter and space. The program would look something like this:
- Call Letter R Subroutine
- Call Space Subroutine
- Call Letter O Subroutine
- Call Space Subroutine
- Call Letter B Subroutine
- Call Space Subroutine
- Call Letter O Subroutine
- Call Space Subroutine
- Call Letter T Subroutine
In this example, you can see that we were able to call the Letter O Subroutine twice and the Space between letters subroutine 4 times. So, we were able to write it once as a Subroutine, and reuse it several times in the program. That, in a nutshell, is Subroutines.
Using Subroutines in the Scribbler Program Maker
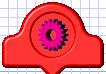
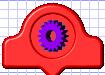
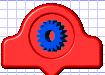
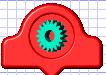
In the Scribbler Program Maker, we use COLORS instead of names. The main routine we start with is ALWAYS Green. The Green routine is always the first one that is run.
You can have up to eight different subroutines, distinguished by color, including the main program, which is always green. A subroutine always begins with a subroutine begin Tile, designated by a gear of the subroutine's color, and ends with a subroutine end Tile, which contains a subroutine return.
Subroutines are arranged in order by color and are organized as such:
|
Green: 1 |
Yellow: 2 |
Orange: 3 |
Red: 4 |
|
|
|
|
|
|
Magenta: 5 |
Purple: 6 |
Blue: 7 |
Cyan: 8 |
|
|
|
|
|
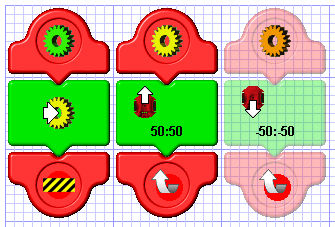 In the example to
the right, there is the green main program and two subroutines, yellow and
orange. The main program calls the yellow subroutine, which commands the S2 to
move forward, then returns. The orange subroutine is never called. That's why
it's shown in a translucent, or inactive, state. When this program is
transferred to the S2, the commands making up the orange subroutine will not be
sent ion order to save memory.
In the example to
the right, there is the green main program and two subroutines, yellow and
orange. The main program calls the yellow subroutine, which commands the S2 to
move forward, then returns. The orange subroutine is never called. That's why
it's shown in a translucent, or inactive, state. When this program is
transferred to the S2, the commands making up the orange subroutine will not be
sent ion order to save memory.
How to Call a Subroutine
Once you have made a new Subroutine, it will remain translucent until you call it from the main Green Routine or another Subroutine. Remember, just because you’ve written the code, doesn’t mean it will get run unless you call it from another routine.
 The call subroutine Tile is used to call a subroutine.
Its edit allows you to click and select the color of the Subroutine to call.
The call subroutine Tile is used to call a subroutine.
Its edit allows you to click and select the color of the Subroutine to call.
End a Program
 There are some
programs that never end. These are usually the programs that are in Infinite
Loops. The goal of these programs is to keep going forever. However,
sometimes you want to end a program when a condition or sensor hit a certain
value. For example, maybe you would like the Scribbler to end its program when
the lights are turned out. Or perhaps once you’ve successfully navigated the
maze, you could end the program.
There are some
programs that never end. These are usually the programs that are in Infinite
Loops. The goal of these programs is to keep going forever. However,
sometimes you want to end a program when a condition or sensor hit a certain
value. For example, maybe you would like the Scribbler to end its program when
the lights are turned out. Or perhaps once you’ve successfully navigated the
maze, you could end the program.
End Tiles provide a way to quit a program immediately, without having to go to the end. They can be inserted anywhere, whether in the main program, or in a subroutine. When your program encounters an end Tile, it quits.
Note: Any LEDs left on will stay on, and any motors left running will continue to run.
In the example to the left, the yellow subroutine is called repeatedly by the main program. The subroutine flips a coin. If it comes up "heads", it plays a little tune; if "tails", it quits. When you run this program, you never know how many times the tune will be played -- maybe not even once.
Trouble Shooting Scribbler Connections
If you are
having problems connecting the Scribbler Robot to the computer, or you keep
getting an error that says ‘No Connection could be made to your Scribbler,” try
the following solutions.
1) Check USB Cable Connections
Make sure the
cable is plugged completely into the USB port on the computer and also into the
port on the robot. It should click when
you insert the cable. (Note: The S2
Robot may have issues with the Adapter if it was connected and the robot moved and
pulled the cable. Try a different Adapter if you have one).
Also, on some
computer setups, using a USB Hub to connect multiple USB devices to a computer at
once can possibly create connection issues. If you are experiencing issues, try to connecting the Scribbler directly
to the computer and not through a USB Hub.
2) Check that Scribbler is powered on
Before you
can download a program to the robot, it must be powered on. Place the robot on top of something so the
wheels are off the table (like a roll of tape) and turn it on. You will see the
blue power LED on if the power is on.
3) Check the Batteries
Check to see
if your batteries are charged. If the
batteries are low, the blue power LED will flash slowly. However, it is
possible there is not enough power in the batteries to program the robot even
if the blue light is NOT flashing. If
the robot is not acting like you think it should, then you might need to
recharge the batteries.
>>Update
the Lesson Worksheet with your observations.