|
Yes, the quickest route between two points is a straight line, but what is the fun in that? In the previous section, you had practice in moving forward and backward with different speeds and times. By now, you should be able to predict how far scribbler will move with different settings. Now, we are going to change the speed of the Scribblers’ wheels so that one turns faster than the other. Can you think what will happen when we do that? If one wheel is moving faster than the other, the Scribbler will turn and move in an arc and can even make a full circle.
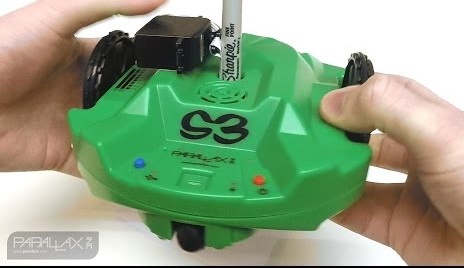
In fact, the Scribbler is so smooth we can use it to draw shapes! Take a look at the Scribbler, there is a hole in the top of the robot. That hole is for holding a Sharpie marker or a Dry Erase marker for use on a white board. In this lesson, we are going to bring out the paper and pens or the white boards and dry erase markers and watch Scribbler draw! Remember to only use a Sharpie on paper, as it can permanently damage a dry erase board or anything else that it draws on.
Here is what we will do in these activities:
Tip: How do we convert from milliseconds to seconds? There are 1,000 milliseconds in a second so 5,000 milliseconds = 5 seconds. 1 Millisecond = .001 Seconds, so we multiply the milliseconds x .001 to get seconds.
Review: How Scribbler Turns
Zero-Turn Radius (ZTR)
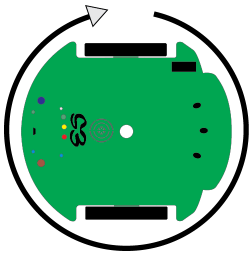
A ZTR turn requires the two drive wheels to move in opposite directions at the same speed for the same duration of time. This type of turn causes the S3 to pivot in place in a clockwise or counterclockwise direction. Speed and time combine to control the amount of rotation.
Wide-Radius Turn
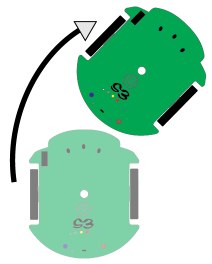
Driving both wheels forward (or both backward) at different speeds creates a wide-radius turn. The S3 moves along a wide arc as it moves forward or backward. Speed and time values combine to control the radius and the length of the arc. We will experiment with adjusting these values to change the type of turn made.
One-Wheel Turn
Locking one wheel in place and driving the other in either direction is a one-wheel turn. These turns make a tight outer radius equal to twice the diameter of the S3 robot. To make a turn at a tighter radius both drive wheels are used with the second wheel rotating the opposite direction at a different speed (remember, equal speed in the opposite direction equals a zero-turn radius). Different wheel speeds and duration combine to control the rotation amount and size of radius. This will become clearer as we experiment with the possible turns.

Example: How to Draw a Figure Eight with Drive Blocks
Did you ever notice that a figure eight turned sideways is the symbol for infinity: 8 or ∞? Our Scribbler can drive a figure 8 pattern or, if you prefer, to infinity. Here is an example program:
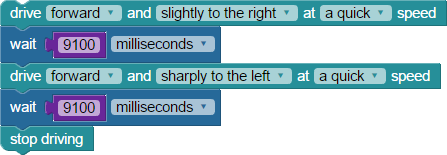
How did it work? Setting the wait time is done by trial and error to set the drive distance of each of the circles of the 8 (or ∞) symbol. Because we are using a less precise way to control the distance travelled, (that is, by using wait time), your milliseconds may vary. This is just one of the many ways that Scribbler can make turns. Let's explore other shapes and turns, beginning with moving in an Arc.
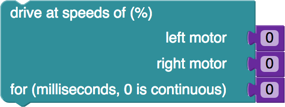
We will use a more precise drive command, one that we have used before. With the drive speed command we can control the speed of the left and right motors and the time of the move.
Pre-Activity Check List:
- Completed the Getting Started Lesson.
- Reviewed the lesson materials.
- Watched the concept and activity videos.
- Scribbler S3 Robot is fully charged (blue light is on).
- Scribbler is connected to a computer via USB cable and wheels are up in ‘garage mode’.
- Clear area to work with the Robot on the floor and to draw.
- Started BlockyPropClient software on the computer, and pressed Connect.
- Have https://blockly.parallax.com website open in Internet Browser and have logged in.
- Reviewed the Motors blockly reference.
- Have paper to draw on and Pen which inserts into the Scribbler or white board and dry erase markers
Arc Activity 1 - Move in an Arc using Drive Distance
|
Activity 1 Steps:
- Start a new Project
- Project Name: Arc Activity 1
- Board/Device type: Scribbler Robot
- Description: move forward on one wheel at a speed of 50 and the other at a speed of -50 for 5 seconds
- Sharing: Private
- Add comments to describe the project.
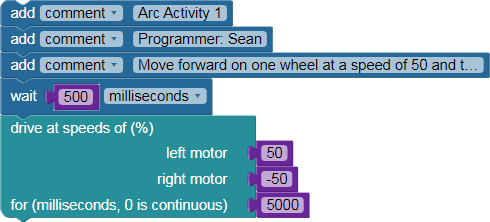
- Add a comment and type ‘Arc Activity 1’
- Add another Comment and type “Programmer: “ and your name.
- Add another Comment and type in "move forward on one wheel at a speed of 50 and the other at a speed of -50 for 5 seconds"
- Add Drive at speed of (%) Block commands
- left motor: 50
- right motor: -50
- for (milliseconds, 0 is continuous):5000
- Save the project.
- Upload and run the project.
- Watch the program run on the robot. Did it work as you expected? You can see it run again by pressing the Blue reset button on the robot.
- Put a pen in the center of the robot, put it on paper, press the reset button, and watch it draw. Make any necessary changes to the project and try again until it works.
|
Arc Activity 2 - Draw an Arc
|
Activity 2 Steps:
- Open My Projects and select Arc Activity 1 (if not already open).
- From the Menu choose Save the Project as
- Project Name: Arc Activity 2
- Board/Device type: Scribbler Robot
- Description: speed of 100 (positive) on the right side and a speed of 10 (positive) on the left side.
- Sharing: Private
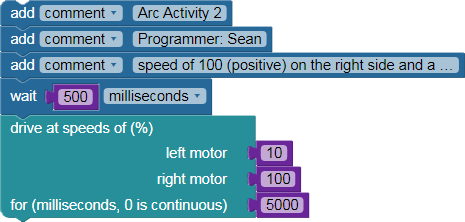
- Change first Comment text to "Arc Activity 2".
- Change the third Comment text to "speed of 100 (positive) on the right side and a speed of 10 (positive) on the left side."
- Change drive speeds of (%)
- left motor: 10
- right motor: 100
- for (milliseconds, 0 is continuous): 5000
- Save the project.
- Upload and run the project.
- Watch the program run on the robot. Did it work as you expected? You can see it run again by pressing the Blue reset button on the robot.
- Put a pen in the center of the robot, put it on paper, press the reset button, and watch it draw. Make any necessary changes to the project and try again until it works.
- Can Scribbler draw an arc in the opposite direction? Try switching the left and right motor values and see if it will draw an arc backward.
|
Arc Activity 3 - Draw a Circle
|
Activity 3 Steps:
- Open My Projects and select Arc Activity 2 (if not already open).
- From the Menu choose Save the Project as
- Project Name: Arc Activity 3
- Board/Device type: Scribbler Robot
- Description: Write a program that will make a full circle..
- Sharing: Private
- Change first Comment text to "Arc Activity 3".
- Change the third Comment text to "Write a program that will make a full circle."
- Change drive speeds of (%)
- left motor: 10
- right motor: 100
- for (milliseconds, 0 is continuous): 10000
- Save the project.
- Upload and run the project.
- Watch the program run on the robot. Did it work as you expected? You can see it run again by pressing the Blue reset button on the robot.
- Put a pen in the center of the robot, put it on paper, press the reset button, and watch it draw.
- Did it draw a complete circle? if not, try adjusting the milliseconds until you have a complete circle.
- Can Scribbler draw a circle in the opposite direction? Try switching the values of the Left and Right motors and see if Scribbler will draw backward.
|
Your Turn - Draw an 8 inch diameter circle
|
|
What do we change in the drive command to determine how large the circle is?
- Write a program to draw an 8 inch diameter circle.
- Create a table to record the Left Motor, Right Motor, TIme, Radius, and Diameter of Circle.
- Experiment with different settings until you have an 8 inch diameter circle, record the settings for each experiment in the table. The last entry should be your 8 inch circle.
|
Arc Activity 4 - Spin in place using Drive Radius
|
Radius-Based Turns
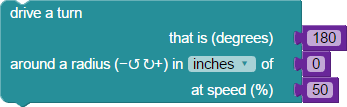
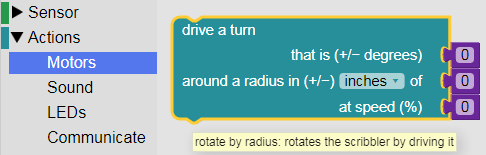
The ACTIONS > MOTORS menu drive a turn block is for moving the S3 through a turn with number of degrees, radius value, and top speed set by the user. This block can do zero-turn radius and arc turns depending on your radius value (leave at 0 for a ZRT turn, put in a value greater than 0 for an arc).
Activity 4 Steps:
- Start a new Project
- Project Name: Arc Activity 4
- Board/Device type: Scribbler Robot
- Description: 180 Degrees, Radius 0, Speed 50.
- Sharing: Private
- Add comments to describe the project.
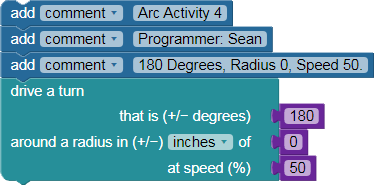
- Add a comment and type ‘Arc Activity 4’
- Add another Comment and type “Programmer: “ and your name.
- Add another Comment and type in "180 Degrees, Radius 0, Speed 50."
- Click Actions, then Motors and drag the drive a turn block into the Worksheet. Change the parameters to:
- that is (+/- degrees): 180
- around a radius in (+/-) inches of: 0
- at speed (%): 50
- Save the project.
- Upload and run the project.
- Watch the program run on the robot. Did it work as you expected? You can see it run again by pressing the Blue reset button on the robot.
- Put a pen in the center of the robot, put it on paper, press the reset button, and watch it draw. Make any necessary changes to the project and try again until it works.
- Experiment with changing the speed value to see what effect it has on the drawing.
|
Arc Activity 5 - Draw an Arc using Drive Radius
|
Distance-Based Turns
The ACTIONS > MOTORS category contains blocks that allow you to input precise travel distances for each wheel. The drive a turn block can be particularly useful in making turns and creating arcs. You may have seen your robot do this already with other blocks.
Activity 5 Steps:
- Open My Projects and select Arc Activity 4 (if not already open).
- From the Menu choose Save the Project as
- Project Name: Arc Activity 5
- Board/Device type: Scribbler Robot
- Description: 90 Degrees, Radius 2, Speed 50.
- Sharing: Private
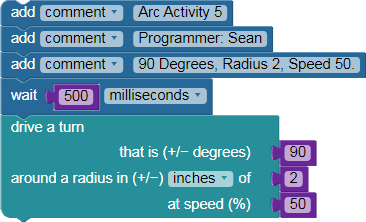
- Change first Comment text to "Arc Activity 5".
- Change the third Comment text to "90 Degrees, Radius 2, Speed 50."
- Change drive a turn
- that is (+/- degrees): 90
- around a radius in (+/-) inches of: 2
- at speed (%): 50
- Save the project.
- Upload and run the project.
- Watch the program run on the robot. Did it work as you expected? You can see it run again by pressing the Blue reset button on the robot.
- Put a pen in the center of the robot, put it on paper, press the reset button, and watch it draw. Make any necessary changes to the project and try again until it works.
- Experiment with changing the speed value to see what effect it has on the drawing.
|
Arc Activity 6 - Draw a 6 inch Circle using Drive Radius
|
Activity 6 Steps:
- Open My Projects and select Arc Activity 6 (if not already open).
- From the Menu choose Save the Project as
- Project Name: Arc Activity 6
- Board/Device type: Scribbler Robot
- Description: 360 Degrees, Radius 3, Speed 50
- Sharing: Private
- Change first Comment text to "Arc Activity 6".
- Change the third Comment text to "360 Degrees, Radius 3, Speed 50"
- Change drive a turn
- that is (+/- degrees): 360
- around a radius in (+/-) inches of: 3
- at speed (%): 50
- Save the project.
- Upload and run the project.
- Watch the program run on the robot. Did it work as you expected? You can see it run again by pressing the Blue reset button on the robot.
- Put a pen in the center of the robot, put it on paper, press the reset button, and watch it draw. Make any necessary changes to the project and try again until it works.
- Experiment with changing the speed value to see what effect it has on the drawing.
|
Your Turn - Draw two lines at a right angle
|
|
How can Scribbler draw 90 degree right angles?
- Create a program that will draw a 6” straight line, spin 90 degrees in place to the right and then draw another 6” straight line, using any of the Drive commands. The result should be two straight lines joined at a sharp right angle turn.
- Record the drive commands you used, left speed, right speed, and other values for the commands in your worksheet.
- Take a screen shot of your code for your worksheet.
|
Your Turn - Make Amazing Turns to Run a Maze
|
Running a Maze!
- Now that you have mastered both straight lines and turns, let’s put your knowledge to work. Time for some Amazing Turns!
- Your Instructor will show you a maze that you must navigate with your Scribbler.
- Program your robot to complete the maze. You will be using the pen/marker to trace your path in the maze. You are not allowed to go outside of the boundaries of the maze. You must complete the entire maze to finish. This may take multiple trials.
Hint: It helps to know the measurements of each section of the maze.
Here is what a sample of the maze looks like:
|
Your Turn - Turn Scribbler into a Pizza Slicing Robot.
|
|
Can you turn Scribbler into a Pizza Slicing Robot?
- First create a program to draw a circle to represent the Pizza. Calculate the exact center of the circle (radius) and manually use a ruler to measure and draw a cross there, marking the center.
- Next create the Pizza cutting program. In this program, when Scribbler's Pen is set in the center cross of the circle, it will rotate and move forward the amount of the radius of the circle to draw one slice of pizza. The robot then turns around and travels back to the center. Then the robot rotates again and travels the radius to draw the next slice, as if it is cutting it. This process repeates as needed, to draw all the slices.
- In a table record the degrees, radius, speed, and the angle cut for each of the 8 slices that you cut when each "slice" is 45 degrees.
- Note: If you cannot get Scribbler to do this with the above directions, is there another way you can think of to get this to work?
|
|